
By Lighting Engineering Team, MVS Lighting — outdoor lighting manufacturer with 5 production lines and 15+ years experience
The goal of parking lot lighting design is not simply to make the lot “bright enough” — it’s to provide a safe, uniform, and visually comfortable environment for both vehicles and pedestrians at night.
Many parking lot lighting complaints after installation aren’t caused by poor-quality fixtures. They’re caused by design decisions made before installation — ignoring illuminance uniformity, pole layout, or glare control.
A well-designed parking lot lighting plan typically needs to achieve several goals at once: improved nighttime visibility, reduced safety risk, elimination of dark zones, glare control, and lower long-term operating cost. For commercial complexes, industrial parks, logistics centers, hospitals, and hotel parking lots, good lighting design usually matters more than simply increasing fixture wattage.
For the full floodlight selection logic across all project types, see our Complete LED Flood Light Guide.
Recommended Lux Levels & Uniformity Ratio (IES RP-20)
Many parking lot owners assume brighter is always better. In practice, uniformity matters just as much as raw brightness.
| Area | Recommended Illuminance | Uniformity Ratio (Avg:Min) |
|---|---|---|
| General Parking Area | 10–20 lux | 4:1 |
| Commercial Parking Area | 20–30 lux | 4:1 |
| Main Driveways | 20–50 lux | 4:1 |
| Entrances / Exits | 30–50 lux | 4:1 |
| High-Security Zones | 50+ lux | up to 10:1 (site-dependent) |
These figures reflect common commercial design targets, informed by IES RP-20 (Lighting for Parking Facilities) guidelines. Local codes may specify different minimums — always verify against jurisdiction-specific requirements before finalizing a design.
Uniformity ratio matters as much as average lux. A ratio of 4:1 or better (average-to-minimum) is the IES benchmark for most parking applications — meaning the darkest point on the lot shouldn’t be more than 4 times dimmer than the average illuminance. If one area is significantly brighter than an adjacent area, drivers’ visual adaptation is disrupted, which reduces — not improves — safety.
For general lux-level calculation logic beyond parking-specific applications, see our Lux Levels Guide .
Pole Spacing & Fixture Quantity Formula
Once target lux and uniformity are set, pole spacing follows a simple calculation:
Pole Spacing = 2–3 × Mounting Height
For an 8-meter pole, spacing typically falls between 16–24 meters. Parking lots generally call for a tighter spacing-to-height ratio than open-area or yard lighting, because uniformity requirements for driver and pedestrian safety are stricter.
As a rough reference point, a mid-sized commercial lot (around 3,700 m² / 40,000 sq ft) typically requires 8–12 fixtures in the 150W–200W range, depending on pole height and layout. Final fixture count should always be verified against a lighting simulation for the specific site.
For the full mounting height calculation logic, see our Mounting Height Guide. For the complete pole spacing formula and additional site types beyond parking, see our [Pole Spacing Guide .
Choosing LED Floodlights for Parking Lot Projects
LED floodlights have become the standard solution for parking lot lighting. When selecting fixtures, wattage alone isn’t the right starting point — the following parameters matter more:
- Luminous Flux (Lumens) — determines the actual light output of the fixture, independent of wattage. For general wattage-selection methodology across applications, see our Wattage Guide.
- Luminous Efficacy (lm/W) — higher-efficacy products deliver the same brightness with lower energy consumption.
- Light Distribution Type — the right beam distribution improves both coverage and uniformity.
- IP Rating & Surge Protection — parking lots are exposed to outdoor conditions long-term. Recommended baseline: IP66 or higher, IK08 or higher, and 10kV surge protection.
- Color Temperature — most commercial parking lot projects use 4000K or 5000K, maintaining good visibility without producing an overly harsh visual effect.
For lots with security cameras, IES RP-20 also recommends verifying vertical illuminance at key points such as entrances and gates — not just horizontal ground-level lux — since cameras depend on light reaching vertical surfaces like faces and license plates.
Once you’ve confirmed the design parameters above, our Parking Lot Floodlight Buying Checklist for Contractors walks through how to compare and select a specific product.
Parking Lot Lighting Layout and Pole Placement
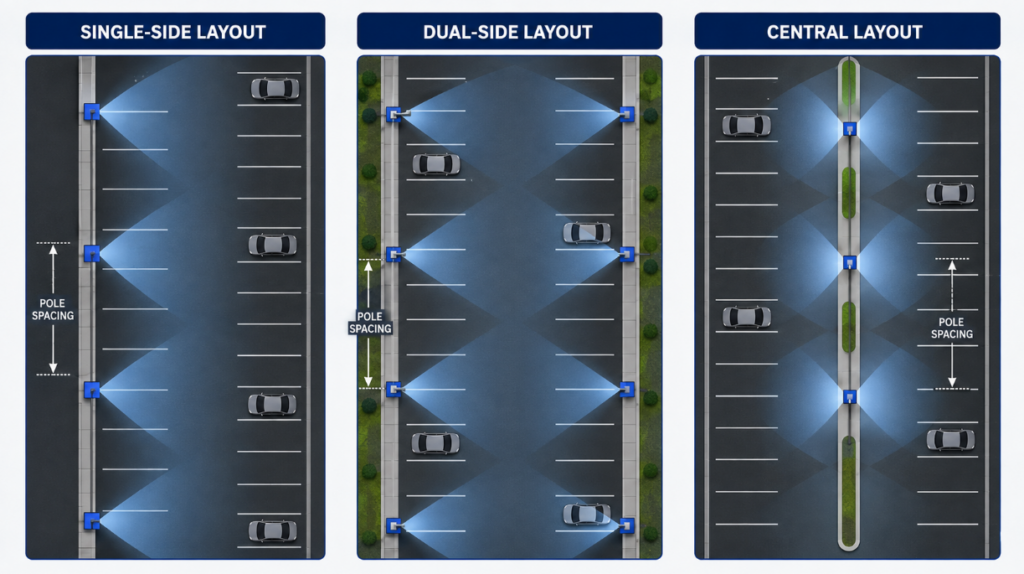
Pole layout is one of the most critical parts of parking lot lighting design. Even high-quality LED floodlights will produce significant dark zones if the layout isn’t right.
Pole height selection follows the same logic used across LED floodlight design — see our Mounting Height Guide for the full calculation formula.
Common layout approaches include:
- Single-Side Layout — suitable for narrower parking areas.
- Dual-Side Layout — suitable for medium-to-large parking lots.
- Central Layout — suitable for large, open parking areas.
A well-matched pole height and spacing combination reduces the total number of fixtures required while improving illuminance uniformity.
Matching Photometric Distribution to Pole Position (Type IV vs Type V)
Which layout works best also depends on the photometric distribution of the fixture itself — not just where the pole sits. In North American parking lot projects, this class of fixture is commonly referred to as an “Area Light,” and the two most common distribution types are Type IV and Type V.
Type IV distribution is asymmetric — light is thrown primarily forward from the pole, spreading side to side, with relatively little light cast behind the fixture. This distribution typically suits:
- The edge of a parking lot
- Perimeters near buildings
- Positions close to a store or property boundary
- Any location where light spilling behind the pole is undesirable
Installing a Type IV fixture at the lot’s edge directs more usable light onto the parking area itself, while reducing spill into neighboring buildings, storefront windows, or beyond the property line.
Type V distribution is generally more symmetric — light spreads outward from the pole in a roughly even pattern in all directions — making it better suited to poles positioned in the interior of the lot.
For larger lots, combining distribution types by pole position is usually more effective than using one distribution type everywhere:
- Type IV at the lot perimeter
- Type V at interior poles
- Adjust wattage and fixture count based on pole spacing and target illuminance
This combined approach is typically easier to balance for uniformity than a single distribution type across the whole site, and it also reduces unnecessary spill light beyond the lot boundary.
Type IV/V describes the horizontal distribution pattern (where the light spreads relative to the pole). Beam angle, covered next, describes how tightly focused that light is — the two work together, not separately, when selecting a fixture.
Beam Angle and Light Distribution
Beam angle selection for parking lots follows the same core principle used across LED floodlight design — higher poles typically call for narrower beams, while lower poles need wider beams to maintain area coverage. This applies within whichever Type IV or Type V distribution pattern you’ve selected for a given pole position.
A beam angle that’s too narrow tends to create bright hotspots. One that’s too wide can reduce effective illuminance across the target area. Beam angle should always be selected alongside pole height, pole spacing, lot size, and target lux level — not on its own.
For the complete NEMA classification and angle-selection formula, see our Beam Angle Guide.
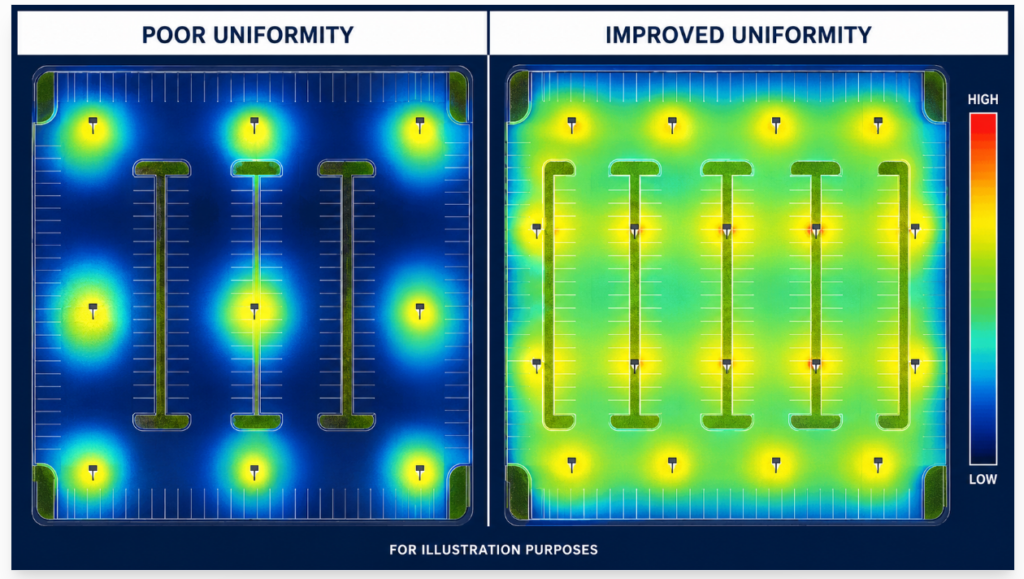
How to Improve Uniformity and Reduce Dark Spots
Poor lighting distribution — not insufficient brightness — is the most common issue in parking lot projects. Dark zones are typically caused by:
- Excessive pole spacing
- Incorrect beam angle selection
- Poorly positioned fixtures
- Insufficient fixture quantity
Improvement methods include:
- Optimize Pole Layout — arrange poles strategically to improve coverage.
- Adjust Mounting Height — changing height directly affects coverage area.
- Select the Right Light Distribution — improves light utilization efficiency.
- Run a Lighting Simulation — verifying the design with DIALux or similar software before installation typically identifies potential issues early, reducing the cost of later modifications — especially valuable for medium-to-large parking lot projects.
Glare Control and Driver Safety
Parking lot lighting needs to be bright enough, but glare-free. Excessive glare affects a driver’s ability to observe their surroundings — particularly at entrances/exits, turning areas, and mixed pedestrian-vehicle zones.
Effective glare control measures include:
- Adjusting installation angle
- Selecting appropriate light distribution
- Improving illuminance uniformity
- Avoiding direct fixture exposure to driver sightlines
Flat Mounting Helps Control Uplight and Glare
In many North American parking lot projects, the Area Light fixture is typically installed at or near a level (horizontal) mounting angle, without tilting the fixture head noticeably upward. The main purposes of flat mounting are to:
- Reduce uplight
- Control distant glare
- Lower the impact on surrounding buildings
- Direct more light onto the parking surface itself
- Help the project meet light-pollution and site-boundary requirements
That said, “flat mounting always controls glare” isn’t an absolute rule. Actual glare performance still depends on the fixture’s optical design, mounting height, wattage, distribution type, and viewing direction. Before finalizing fixtures, the design should still be checked with IES files and a lighting simulation to verify illuminance, uniformity, glare, and spill light at the site boundary.
Good glare control improves both overall safety and user experience across the parking lot.
Smart Parking Lighting Application
For larger parking facilities, lighting can be integrated with vehicle detection and zoned controls, rather than each fixture responding only when a vehicle enters its own sensor range. A linked system raises the output of several fixtures ahead of an approaching vehicle — along the lane and at intersections — then returns them to a background level once the vehicle passes, keeping the route ahead continuously lit rather than lit one sensor at a time.
| Control Mode | Linked Range | Main Purpose |
|---|---|---|
| Energy-saving mode | Small | Fewer lights activated |
| Balanced mode | Medium | Balance between visibility and energy use |
| Bright mode | Large | More lights activated ahead |
| Individual sensing | None | Only the detected fixture responds |
More advanced systems can also integrate with parking-guidance sensors or cameras, dimming unoccupied zones while pre-lighting the route toward available spaces. This adds real value on larger sites, but also adds commissioning cost and complexity — it’s worth planning alongside the base lighting design from the start rather than retrofitting it later.
MVS Engineering View: The maximum energy-saving percentage shouldn’t be the only objective. Activating only the fixture directly above a vehicle keeps energy use low, but the route ahead can stay dark and uncomfortable to drive. Activating several lights in advance, tuned to actual traffic volume, is usually the better trade-off.
For dimming protocol and wiring-level detail (DALI vs 0-10V), see our [DALI vs 0-10V Dimming Guide — 待补:#08尚未上线,暂无真实URL].
Common Parking Lot Lighting Design Mistakes
- Focusing Only on Wattage — wattage does not equal brightness. A lower-wattage, higher-efficacy fixture with the right distribution can outperform a higher-wattage one poorly matched to the site.
- Ignoring Uniformity — localized over-lighting and under-lighting are equally problematic for safety; an acceptable average lux figure can still hide dangerous dark pockets between poles.
- Excessive Pole Spacing — spacing beyond the 2–3× mounting-height guideline leads to significant dark zones, even when the average lux target is technically met.
- Ignoring Glare — fixtures aimed into driver or pedestrian sightlines reduce visual comfort and safety, regardless of how bright the site measures on paper.
- Ignoring Environmental Conditions — coastal, high-temperature, and high-humidity environments accelerate fixture degradation and require a higher IP/IK rating and surge protection than a standard inland site.
Information Needed Before Starting a Parking Lot Lighting Design
To develop an accurate lighting plan, it helps to prepare the following information in advance:
| Item | Details |
|---|---|
| Site Dimensions | Length, width, total area |
| CAD Drawings | Preferred, if available |
| Pole Height | New installation or existing poles |
| Illuminance Requirements | Standard or high-security level |
| Control Method | On/off, timer, or dimming |
| Environmental Conditions | High temperature, coastal, humid, etc. |
This information allows a lighting engineer to complete accurate product selection and simulation.
Frequently Asked Questions
What wattage LED floodlight is suitable for parking lots? Most projects use 100W to 300W fixtures, depending on pole height and target illuminance. See our Wattage Guide for the full selection logic.
What pole height is typical for parking lot lighting? Commercial projects commonly use 8- to 10-meter poles.
Is brighter always better for parking lot lighting? No. Uniformity — ideally 4:1 (average-to-minimum) or better per IES RP-20 — generally matters more than simply increasing brightness.
Should I use Type IV or Type V distribution for my parking lot? Type IV suits pole positions at the lot’s edge or near property boundaries, since it throws light forward with minimal spill behind the fixture. Type V suits poles in the interior of the lot, since its distribution is more symmetric. Larger lots often combine both by pole position.
What information is needed for a parking lot lighting design? Site dimensions, pole information, illuminance requirements, and control preferences are the most important baseline details.
Do I need a lighting simulation before installation? For any project beyond a small lot, a DIALux or equivalent simulation is recommended to verify lux distribution and uniformity before finalizing the design.
(Schema要求:FAQPage结构化数据,同04/05/09篇要求确认技术团队已配置)
Final Thoughts
There is no universal parking lot lighting design — the right approach depends on lot size, security requirements, and layout constraints, verified against IES RP-20 uniformity and illuminance targets rather than generic wattage assumptions.
Not sure what layout fits your parking lot? Ready to move from design to product selection, see our Parking Lot Floodlight Buying Checklist for Contractors, or send us your site dimensions for a free layout recommendation from our engineering team.
Browse our LED Floodlight Series.